Test Stitching 101: The Key to Flawless Embroidery (+ 10 Project Ideas to Use Your Test Stitches!)
Before embroidering a project, test stitching the design is key to ensuring that all elements are compatible. This is even more important if the project can’t be easily replaced. Why Test Stitching Matters in Embroidery Before stitching a design onto your final project, always test stitch it first! This ensures the design runs smoothly with your chosen machine settings and fabric. Professional digitizers carefully create embroidery files to stitch in a logical order, minimize jump threads, and maintain stitch density suitable for most fabrics. However, after test stitching, if the design doesn’t meet your expectations, you may need to make… The post Test Stitching 101: The Key to Flawless Embroidery (+ 10 Project Ideas to Use Your Test Stitches!) appeared first on Sew Daily.
 nikhil

Before embroidering a project, test stitching the design is key to ensuring that all elements are compatible. This is even more important if the project can’t be easily replaced.
Why Test Stitching Matters in Embroidery
Before stitching a design onto your final project, always test stitch it first! This ensures the design runs smoothly with your chosen machine settings and fabric.
Professional digitizers carefully create embroidery files to stitch in a logical order, minimize jump threads, and maintain stitch density suitable for most fabrics. However, after test stitching, if the design doesn’t meet your expectations, you may need to make adjustments using embroidery software.
Even if the design stitches perfectly, its density might be too much for lightweight fabrics. In that case, you can either remove some stitches using software, select a different design, or switch to a more suitable fabric.
Test stitching also helps identify necessary machine adjustments. For example:
- If dense designs cause thread breakage, try slowing down the stitching speed.
- If the fabric is bulky and drags, adjust the presser foot pressure.
For the most accurate results, always test stitch using the same stabilizer, fabric, needle, and thread as your final project. This small step can make a big difference in achieving professional embroidery results!

Test Stitching Stabilizer
Keep at least one cut-away, tear-away and water-soluble stabilizer roll on hand. Having two or more weights of each stabilizer broadens your design and fabric options. In addition, keep a water-soluble topper on hand. The topper helps maintain smooth stitching when embroidering napped fabric.
Test Stitching on Fabric
If making a project from scratch, purchase additional fabric for test stitching. First, cut out only the pattern pieces that won’t be embroidered. Trace the pattern piece to be embroidered onto the remaining fabric. Embroider the design. If satisfied with the results, cut out the pattern piece. If unhappy with the design, make the necessary adjustments, shift the pattern on the fabric and try again.
It isn’t necessary to test-stitch on the exact project fabric, but use the same fabric weight and type. For instance, if you often work with quilt-weight cotton fabrics, purchase additional fat quarters for test stitching. Choose fabrics from the same collection, as the weights are often very similar. Don’t test-stitch only on white fabric. Instead, choose fabrics that coordinate with the project. If the test stitch is successful, use it in another project. Or purchase fat quarters that coordinate with your home décor. Instead of cutting a hoop-size fabric piece for the test stitch, cut a fat quarter in half and embroider the center. This yields more useable fabric to transform into a project.
Plan ahead to create a larger project, such as a quilt, from several test stitches. Test-stitch designs on coordinating fabric colors. The background fabrics unite the designs, even if they’re from different embroidery collections.
If embroidering on a ready-made garment, there may not be extra fabric to use for test stitching. Visit a local thrift shop to purchase another garment similar in fabric type, weight and color (if possible) for test stitching. If the design stitches correctly, keep the garment, give it to a friend or donate it back to the store.

Needle & Thread
The correct needle and thread combination produces skip-free, fray-free stitching. Using a needle with too small of an eye causes thread breakage. Embroider the test sample using the same needle and needle and bobbin thread type you’ll use on the project. Avoid using the remains of old thread spools for test stitching unless the thread is the same type you’ll use for the final project.
Using Stitchouts (10 Ideas!)
There are many ways to turn a test stitch into a project. Use coordinating ribbons, trims, beads and fabrics and try one of the following test-stitch project ideas:
1
Create a mini-quilt wall hanging from a single design, or patch test stitches together to create a quilt.

2
Cut around the design using pinking shears or a decorative rotary cutter blade, and then glue or stitch it onto a greeting card.
3
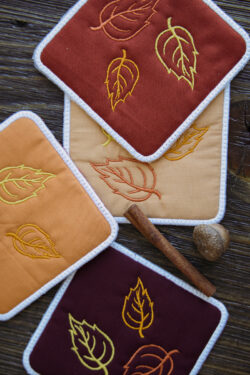
Turn the design into a pincushion, bookmark, sachet, coaster, gift-card holder, magnet, or gift or luggage tag.

4
Make a simple pouch for a mobile phone, tablet, or other device

5
Cut out the design 1⁄8″ beyond the stitches and use fabric glue to attach it as a freestanding appliqué to a pair of canvas shoes, backpack or other hard-to-embroider item.
6
Frame it for a tabletop or wall-hanging. For a smooth, flat finish, follow these steps:
- Press the test stitch wrong side up on a towel.
- Center the glass on the test-stitch wrong side and trace the perimeter.
- Using the glass as a template, cut a thin piece of fusible batting.
- Fuse the batting inside the traced outline on the test-stitch wrong side.
- Trim the test stitch to 1″ larger than the batting.
- If the frame didn’t come with a cardboard piece, cut one using the glass as a template.
- Spray the cardboard with temporary spray adhesive; center on the batting.
- Wrap the fabric edges onto the cardboard. Glue the edges in place using fabric glue, mitering the corners.
- Insert the test stitch into the picture frame (with or without the glass).
- Insert the backing.

7
Donate it. Many sewing or quilt guilds often incorporate the test stitches into one of their service projects. Childcare centers or kindergarten classrooms may also have use for them for craft projects.
8
Decoupage the test stitch onto a gift or jewelry box.
9
Purchase a mug or cup with a compartment to insert a picture and insert the test stitch instead.
10
Make a book for a child. Glue two test-stitch fabrics wrong sides together, and then bind, serge- or zigzag-finish the edges. Stitch the pages together along the left edges, or add buttonholes to each left-page edge and tie them together with ribbon.
Test stitching is a simple yet essential step to ensure your embroidery projects turn out beautifully. It helps you troubleshoot design issues, adjust machine settings, and choose the best fabric and stabilizer for the job. And the best part? Those test stitches don’t have to go to waste! With a little creativity, you can repurpose them into fun and useful projects, from coasters and keychains to quilts and appliqués. So next time you run a test stitch, think beyond the scrap pile and turn it into something unique and meaningful! Happy stitching!


Enjoy patterns, articles & surprises with the Sew Daily Makers Club for one low annual price!
The post Test Stitching 101: The Key to Flawless Embroidery (+ 10 Project Ideas to Use Your Test Stitches!) appeared first on Sew Daily.


