Sewing Sustainable Sleepwear: Organic Embroidered Pajamas That Are Outta This World!
Organic kids’ clothing can be expensive, but sewing your own lets you create cozy, chemical-free pajamas for less—customized to fit your little one’s style and comfort. I stitched up an adorable embroidered pair, adding a fun, personal touch while staying true to my commitment to sustainable, high-quality materials. Want to make your own? This tutorial has you covered! The Fabric: Printed Cotton and Bamboo Before the pandemic, I rarely shopped online—especially for fabrics! But when it became my only option, I discovered a whole new world of possibilities. Online shopping allowed me to source sustainable brands and unique fabrics beyond… The post Sewing Sustainable Sleepwear: Organic Embroidered Pajamas That Are Outta This World! appeared first on Sew Daily.
 nikhil

Organic kids’ clothing can be expensive, but sewing your own lets you create cozy, chemical-free pajamas for less—customized to fit your little one’s style and comfort. I stitched up an adorable embroidered pair, adding a fun, personal touch while staying true to my commitment to sustainable, high-quality materials. Want to make your own? This tutorial has you covered!
The Fabric: Printed Cotton and Bamboo
Before the pandemic, I rarely shopped online—especially for fabrics! But when it became my only option, I discovered a whole new world of possibilities.

Online shopping allowed me to source sustainable brands and unique fabrics beyond my local stores. However, I’ve always been mindful of where I shop, even online, choosing relatively local retailers to help reduce the environmental impact of shipping.
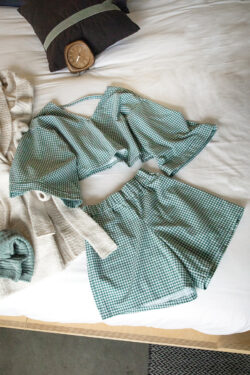
Here are the fabrics I chose for these pajamas:
✓
Cotton Lycra Knit Print (IMA-GINE F21 – Lightning Green) from Fabricville
✓
Bamboo French Terry (by Simplifi Fabric)
Start by looking local, then explore online to discover even more amazing eco-friendly options. I also bulk-ordered a variety of chemical-free prints to sew my son an entire drawer full of cozy pajamas. These pajamas come together quickly with batch sewing and make fantastic, thoughtful gifts too!
The Pattern: Stylin’ Kids PJs
Pajamas are some of the most loved and worn pieces in a child’s wardrobe (and let’s be honest, adults too!). That’s why they’re the perfect project to get creative with fun fabrics, appliqués, and embroidery—but it all starts with a great pattern.


Investing in children’s sewing patterns is smart since kids grow so quickly, and most patterns come multi-sized, allowing you to cut and sew the next size up as they outgrow their current ones. I used the Stylin’ Kids PJs pattern (also included in the updated Makers Club base collection!) which comes in sizes 2T–6, making it easy to sew cozy pajamas that grow with them.
Tip: To help choose a pattern size and make any alterations, grab a garment you know fits your little one to compare length, rise, width and elastic lengths.
Cut
I pre-washed all my fabrics to ensure they were soft and shrink-free—then, excitedly, I got to cutting! I started with the top since I planned to add embroidery, making it easier to work with before assembling the pieces.


For my son, I started with the 2T size but made a few alterations after comparing it to a favorite top from his closet to ensure a perfect fit. I cut the front and back of the top from the French terry and used the lightning bolt print for the sleeves and neckband.
Embroider
The first step was to start the embroidery on the front of the top while I cut out the pant pieces.


I don’t like to hoop knit fabrics, so I used my favorite sticky stabilizer instead. I hooped the stabilizer, then aligned the center of my hoop with the center of where I wanted the embroidery design. To tie everything together, I chose thread colors that matched my print.
New to embroidery? If you need help with stitching on different fabrics, design placement, or choosing the right stabilizer, be sure to sign up for our Machine Embroidery Master Class starting this week!

There are many ways to transfer designs to your machine, but my favorite is using mySewnet software. I open the design on my computer, where I can easily change thread colors and preview the final look. Then, with a little magic (and Wi-Fi), it instantly appears on my machine, ready to stitch!


With a knit sewing machine needle installed, my design stitched out beautifully – I used the small size of our Rockstar embroidery design (it’s available in two sizes).

To make it comfortable to wear, I fused a small piece of soft knit interfacing on the wrong side of the embroidery design.
Construct
The great thing about knit fabrics—especially in kids’ sizes—is how quickly they come together. I actually finished sewing the entire pair of PJ pants while the top was still stitching out the embroidery!


For the top, I stitched each sleeve to the front and back pieces, then sewed the side and sleeve seams in one continuous pass. I used my serger for a clean finish, but a stretch stitch or narrow zig-zag on a regular sewing machine works just as well—just be sure to use a stretch needle.
Next, I attached the neckband. After sewing the short ends together, I evenly stretched it around the neckline and serged it in place for a smooth, professional finish.

To topstitch the neckband seam and finish all the hems, I used a cover stitch hem finish on my machine—it’s my go-to for giving homemade knit garments a polished, professional look. Plus, it holds up better over time and doesn’t pop like a zig-zag stitch sometimes can.
Tip: To hem very small circular circumference (like a sleeve hem) flip the sleeve wrong side out and stitch from the right side.


As I mentioned earlier, the pants came together quickly while the top was embroidering. With no side seams, I only had to sew the inseams and crotch curve—making construction a breeze. For the waistband, I cut the elastic to size, stitched it into a loop, and evenly stretched it into the waist seam as I serged.
I finished the hems just like the top, but for the waistband, I removed the free arm compartment on my machine. This made it easier to topstitch while stretching the elastic for a smooth, flexible finish.

Sewing your own embroidered pajamas is a fun and rewarding way to create cozy, personalized sleepwear while staying true to sustainable values. With a little creativity and the right techniques, you can make pieces that are not only comfortable but also full of character—perfect for your little one’s wardrobe. Plus, once you’ve mastered one pair, you’ll want to stitch up more!
Looking for your next pajama project? Try these patterns for even more embroidered goodness:


Want to get the most out of your embroidery machine and everything Sew Daily has to offer? Join the Makers Club! Every Monday and Friday, you’ll receive a new sewing pattern download, and Wednesdays are all about embroidery—with a fresh design delivered right to your inbox. Today’s Rockstar design was the featured embroidery, and there’s always something new to inspire your next project!

Enjoy patterns, articles & surprises with the Sew Daily Makers Club for one low annual price!
The post Sewing Sustainable Sleepwear: Organic Embroidered Pajamas That Are Outta This World! appeared first on Sew Daily.


