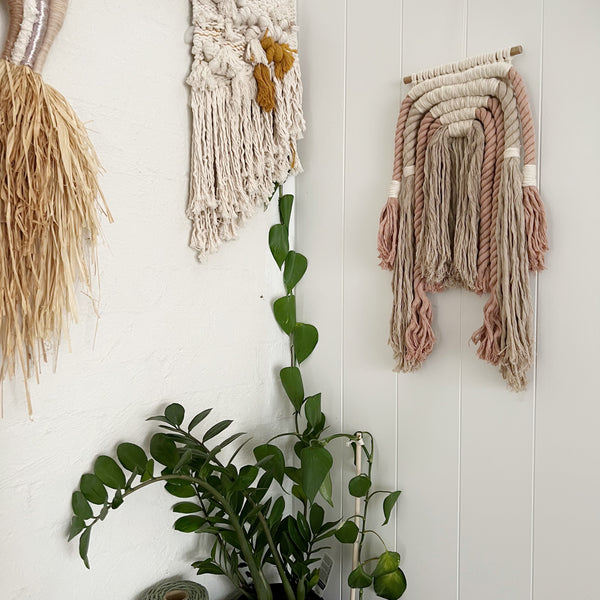
Free DIY Layered Macrame Wallhanging Pattern
Free DIY Beginners Macrame Wall hanging. Hello and Welcome. I have created a free boho macrame wall hanging pattern for you to get your creative juices flowing. This pattern requires only a few macrame knots, it is easy follow and even easier to appropriate into an original design of your own.More
 nikhil
Hello and Welcome.
I have created a free boho macrame wall hanging pattern for you to get your creative juices flowing. This pattern requires only a few macrame knots, it is easy follow and even easier to appropriate into an original design of your own. Feel free to follow to a tee or; mix up your fibres, lengths and explore the fun of fibre art!
This is a fun one to start, if you wish to take on a more challenging pattern to flex your fibre skills I have more patterns here. Our macrame patterns have been made by thousands of creatives all over the world, they are a great way to skip the boring beginning and messy middle... you'll gain creative confidence and learn secret maker tricks from the get go.
Good luck!
Step One: Gather Materials and Set Up Space
- 40cm Wood Dowel - see your local hardware for this or a stick from nature
- 16 x 3m 5mm lengths of Cotton String - use colour or natural
- 2.5m of 15mm lengths of Twisted Cotton Rope - use colour or natural
- 1.5 m of 20mm lengths of Twisted Cotton Rope
- 4 x 30cm 5mm lengths of Cotton String
- 1 x Sword Needle - this is not like any other needle!
- 2m x 1.5mm Cotton Warp String

Step Two: Lets Start Making!
- Secure dowel to a fixed area.
- Using a larks heads knot, attach your x16 3m Cotton String lengths to your wooden dowel.
Step Three: Attaching the XXL Thick Rope
- Divide your 2.5m of 15mm XXL Cotton Rope into three sections. 1m, 90cm, 60cm lengths.
- Take your 1m length and tie it to the dowel with small loops of cotton so it hangs their by itself. We do this so it makes the 15mm rope easier for us to use. The small loops of cotton will be removed so don't worry about making them perfect. Even out your rope ensuring that their is equal amounts of 15mm rope on ether side of string.

Step Four: Securing XXL Rope
Your x16 lengths of Cotton Cord became x32 when attached to the dowel. You will use all x32 of them to secure your 15mm XXL Rope using a half hitch knot.
When attaching your first section of XXL Rope the key is for it to sit firmly against the dowel, no or very little gaps. You can tighten your knots and gaps at this stage but once secure and more rows (and weight) is added, you cannot go back and fix them. I pull tight and use a very firm hand here, otherwise i re do it.
Half Hitch Knot:
- Take your first length of cotton cord in your hand.
- Pull it towards you, wrapping it UNDER the XXL Rope.
- Then place it OVER the XXL Rope, resting the cord to the right.
- Pull very firm.
- Take the SAME cotton cord and again pull it towards you, wrapping UNDER and OVER the XXL Rope. This time resting to the left.
It will nestle in between your wraps, this should be very firm, secure and close to the wooden dowel. If not, you may like to redo. It is very important to get the first few knots perfect as they will effect the overall aesthetic of your work.

Take the time to practice for perfect, there is no rush.
Step Five: Continue Pattern
- Once you have successfully attached your first length of cotton cord, repeat the half hitch knot with your second length.
- And then third...
- and so on and so on... until you have created a half hitch knot with all x32 cotton cords.
You can see below that creating a straight, firm and balanced work is key in the beginning.

Step Six: Adding Additional Layers
- Take your 1.5m 20mm XXL Rope and cut into two lengths. 1m & 50cm.
- Using the handy loops from above, loosely hang your 1m 20mm XXL Rope.
- Count FOUR cords in from the left hand side, take the FIFTH length of cotton and create a half hitch knot around the 20mm XXL Rope.
- Knot along the entire length of XXL Rope, leaving the last FOUR lengths of cotton untouched.
You are creating a tapered effect by leaving cords at the beginning and end of your work. A very simple way to achieve an elegant and refined look.

Here you will follow steps from above, continuing to add XXL Rope with the same technique. Each time you will use little cotton loops to hols the XXL Rope secure to start. Each time you will leave cotton cords at the beginning and end unknotted to create a tapered effect.
Step Seven: Adding Additional Layers to Close
- Attaching XXL Rope Layer Three
Use your 90cm 15mm XXL Rope
Leave four cords at the beginning and end
- Attaching XXL Rope Layer Four
Use your 60cm 15mm XXL Rope
Leave two cords at the beginning and end
- Attaching XXL Rope Layer Five
Use your 50cm 20mm XXL Rope
Leave two cords at the beginning and end

Congratulations. the hard part of this pattern is completed.
You will see that the pattern is naturally tapering.
It is at this stage that I remind you not to look at your work and judge it too closely. Just like a cake that you don't eat until its fully baked and decorated, there are still a few finishing steps that will make all the difference and will make your work pop! It's time to finesse!
Step Eight: Creating Barrel Tassels

You can add a fun little end to any or all of your ends. Doing this in a contrasting colour looks great, you can also use a different fibre (like silk) to add added interest to your design. I tend to scatter their placement level to give the work movement. Have fun exploring this barrel technique and where they suit your work best.
- Take a 30cm cotton string length. To make this easier to understand let's name both ends of the cord. A and B.
- Create a loop on one of your XXL Rope lengths. A will point down, go up the XXL Rope and then come back down.
- Wrap the length of the cotton string around the loop (the height / size of this is up to you) You will be getting closer to B.
- Take B and thread it through the top loop. Hold this firm.
- Take A and pull it tight. This will pull B through the wrapped barrel area.
- Snip the loose A thread and you're done!
Add this fun little accent onto any area you wish. It will secure the internal cotton, you can loosen the XXL Rope strands and above the barrel will stay twisted.

Step Nine: Sewing Layers - this is not a mandatory step
If your layers are not a close as you would like, you can add a little stitch through your XXL Rope to pull it in a little.

- Take your Sword Needle and 1.5mm Warp String
- Start at the bottom of your piece and push firmly all the way through your work. The needle will pass through the XXL Rope. Depending on how tight your half hitch knots are, this will be tricky, You can use pliers to help push it through or stand the work up, rest the needle on a stable surface and use gravity to help lower the work down into the needle.
Do not try this with a regular needle. The Sword is custom manufactured for this purpose. A typical sewing needle will not act similarly. - When you get to the top of your work, return and sew back to the bottom. You can repeat this a few time and along the work if you wish. I typically only sew up, down, up, then secure the warp cord.
- Whilst you require your work to be secure, you are not hanging heavy good off it so it doesn't have to be over sewed. I advise you to do this step now if you can.
Step Ten: Unwind, Brush & Trim
You've made it! You're almost finished. Here is where you will finalise your design.
- Unravel and unwind any lengths that you wish. I choose to do this to some, but not all to add depth and interest to the design
- Brush any unravelled ends to create an even softer aesthetic.
- Trim lengths to suit your space.

And you're finished!
I know you will LOVE your final piece, I would love to see what you have created, feel free to share it on socials and tag me @marymakerstudio. Now that you are finished i guarantee you will want more, I don't blame you! Macrame is such a fun and handy hobby to have. There is a great pride in creating handmade wares for your own home, you can mix up the colours, sizes and explore more designs as your skills bloom. Also, once your friends and family realise that 'you made it' you'll be busy creating gifts for them too!
We have more detailed and advanced patterns available here, we also offer ready to go kits that include a printable pattern and supplies (a great gift for you and them!)
A big thankyou for spending your time slowing down and learning with me.
Let me know what else i can help you with over at @marymakerstudio
Better together,
Brydie x


