5 steps to make sure your spongebar isn’t causing you problems!
One of the (many) great things about knitting machines is their durability. But there is one part that is definitely not famed for its durability - and that’s the humble spongebar. Here I share 5 steps to follow to make sure that a dodgy spongebar never derails your machine knitting again!
 nikhil


When was the last time you checked your spongebar?
One of the (many) great things about knitting machines is their durability. Many of us are using machines that are well over 30 years old and they still work beautifully. But there is one part that is definitely not famed for its durability - and that’s the humble spongebar. Aside from knitting machine needles, spongebars are perhaps the only other part in a knitting machine that need replacing on a regular basis.
But you’d be forgiven for not even knowing it existed! If you look in your instruction manual for your knitting machine, there is usually not a single mention of the need to check and replace it. If you are lucky, it might be mentioned as a part that needs removing when you are changing needles. But that is normally it!
And yet your spongebar is probably one of the most important parts in your knitting machine - if it’s missing or worn out successful machine knitting is almost impossible.
So it’s vital to keep an eye on it and be ready to change it as soon as its getting close to the end of its shelf life.
Here I share 5 steps to follow to make sure that a dodgy spongebar never derails your machine knitting again!
Step One - does your knitting machine have a spongebar?
If you have a Silver Reed or Brother knitting machine the most likely answer is “Yes”! There are a few exceptions - like the Zippy 90 plastic machine - but on the whole all Japanese domestic knitting machines use a metal and sponge “needle retaining bar” to hold all your needles securely in place. Without one, your needles will jump all over the place and create havoc.
The easiest way is to check the section in your instruction manual for how to change a needle. If the instructions tell you to remove your “needle retaining bar” then you know it’s needed.
You can obviously also take a look at your machine and see if one is already there - but beware if you have just picked up a 2nd hand machine. The person passing you the machine might never have been the original user and so there is no guarantee that all the parts and accessories that should be there, really are. At best, the spongebar might be so old to be virtually non-existent which brings us to Step Two.
Step Two - check, check & check again!
One of the first things you should do, whenever you acquire a new (to you) knitting machine is check the needles and spongebar.
It’s quite easy to check the quality of the spongebar by using a spare needle to pull up the hook of a few of the needles in random places. If they spring back into place, then all is fine.

TOP TIP: If your spongebar is in good condition all your needles should sit nice and firmly on the number strip and when you push them out and back in, they should move nice and smoothly without wiggling.
It’s good practise to clean and service your machine on a regular basis. Within the Community we run an annual clean & service your machine workshop at the start of every year to make sure you are starting the year with a happy machine. It’s also good to have a mini clean in between every machine knitting project. If you build checking your spongebar into these routines then you will be on top of it without a second thought!
Step Three - be prepared!
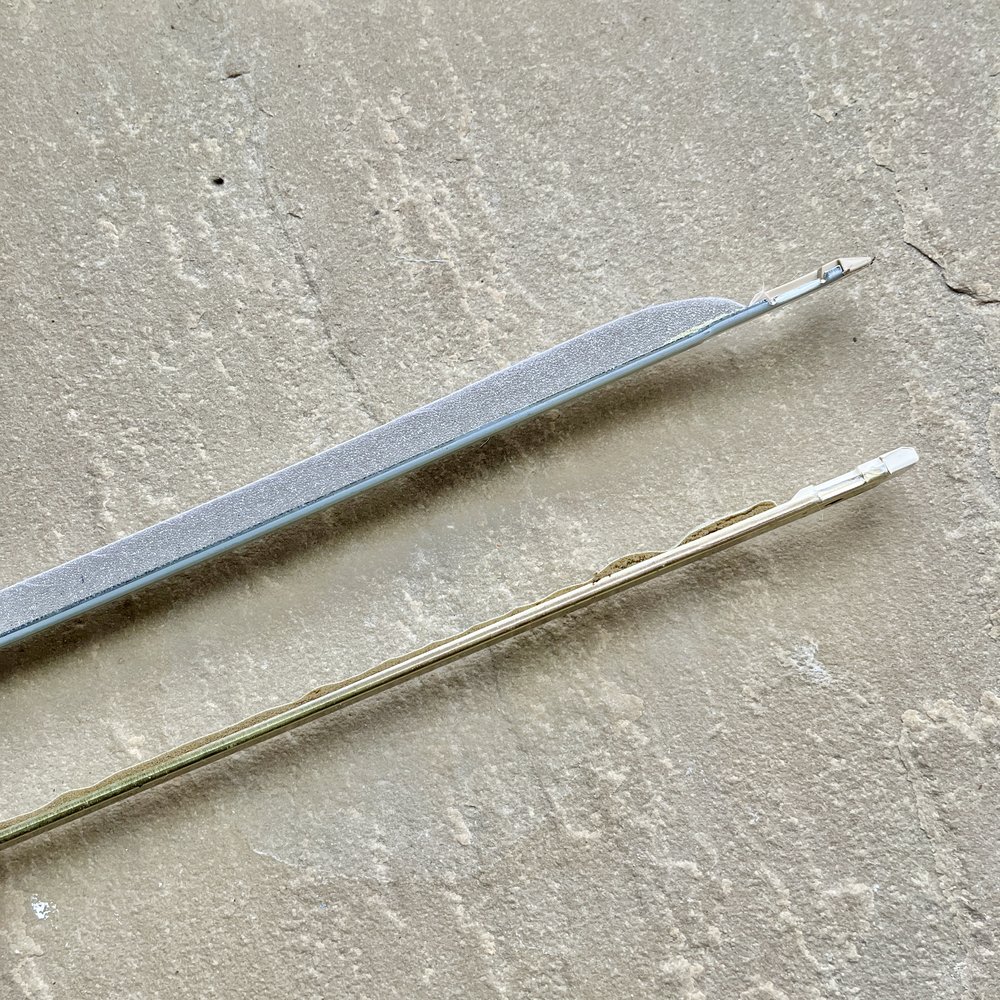
Spot the difference! On the bottom spongebar the foam is non-existent!
Spongebars degrade over time and so if you are a regular machine knitting there is no escaping the fact that you will need to change it at some time. And you know it’s bound to become a priority just when you are in the middle of an urgent project - that’s how life works!
How frequently you need to replace it will depend on a few things such as the quality of the foam, how often you use your machine and how long the bar has been in place. It can be as often as every year. Although I have often gone 2 or 3 years before I have needed to make a change so it will definitely vary which is another reason for regular checking!
So to be on the safe side - and save yourself added stress - it’s well worth having a replacement spongebar on hand so you are ready when you need to change it.
That means it’s also good to take the time to find a trusted supplier near to you and keeping their details handy. Then as soon as you replace your spare bar you can order your next one straightaway and you’ll never have to break stride with your knitting.
I’m not going to add multiple links here for suppliers as it will vary depending on which country you live in. Plus the information changes all the time. Check with a local machine knitting guild or online forum and somebody close to you will be able to point you in the right direction.
Step Four - to DIY or not?
Whilst not as expensive as a knitting machine itself, a spongebar is not cheap either - especially when you add in shipping. The shape and delicate nature mean that they are not easy to post and so they require careful packaging. That means that people are often looking for cheaper options.
One of these is to make your own by just replacing the foam and many places will supply you with foam that is much cheaper and easier to pop in the post.
Ultimately the choice is up to you. Which is more important to you - time or money?
It’s not a really tricky job to replace the spongebar but it will take a bit of time and attention and there are severe risks is you don’t do it well and you end up with foam on the inside of your machine.
Personally, I would much rather pay an extra few pounds for the reassurance that my spongebar is reliable and ready to go and I don’t need to do anything with it.
Two people that we use and trust in the UK for knitting machines and spare parts for knitting machines are Golden at Knit Machine Parts and Andrea at Andee Knits.
Step Five - rest up!
If your machine is likely to be out of action for a while, then there is no need to keep the spongebar inside the needle bed. One of the quickest things to wear down the foam is the needles pushing against it - even when they are not knitting. If you remove the bar from your machine and store it somewhere you can find it quickly and easily, when you need it, then it will last far much longer.
Just don’t try and transport your machine anywhere without the spongebar in place or you will open up the lid to find that your needles are all over the place!!
In a recent post inside the Community, we asked members the last time they had checked their spongebar. I was glad to see that over 60% had checked within the last 6 months. But when was the last time you checked yours? Don’t run the risk of ruining a precious machine knitting project - follow the five steps about and you can stay ahead of the game with your spongebar so you can focus on your machine knitting instead.


